Friday 30 March 2012

251) TARIYÉ BAKRI OR RAVA PATHIRI


TARIYÉ BAKRI OR
RAVA PATHIRI
AN EASY-TO-MAKE, TASTY,
THICK SEMOLINA PANCAKE


Ingredients (to make 8 pancakes):

     1)    Bombay rava or tari (fine whole wheat semolina) – 500 gm.
     2)    Water – 750 ml.
     3)    Tender ginger – 1½ inch piece
     4)    Hot green chilies – 3 Nos. (If you want it hotter, use 5 Nos.)
     5)    Tender curry leaves – 2 sprigs
     6)    Coconut – ½
     7)    Salt – 1 teaspoon
     8)    Any cooking oil to grease the pan


To Cook:

          Grate the coconut and set aside. Peel the ginger and chop roughly to pieces. Discard the stems of the green chilies. Put the grated coconut, the ginger pieces, the green chilies, the curry leaves and the salt into a food processor. Pour in a glass of water and grind for a very short time in order to crush the ginger and the chilies and to get a rough paste. Transfer to a mixing bowl.

          Tip in the rava and pour in the remaining water. Mix nicely. Set a flat pan on high heat. As soon as the pan is hot, grease it with cooking oil and put in a handful of batter. Flatten the batter uniformly with your fingers, taking care not to touch the hot pan (traditionally, the batter is handled by hand alone but you can use a ladle if you so wish). The ideal thickness will be ¼ inch (5 to 6 mm.). Lower the heat and cover with a lid or a cloche.

          Open the lid after a minute. If cooked (the batter would have solidified), dribble a little cooking oil over the top and use a flat ladle to gently flip over the pancake (which resembles more of a flatbread) without breaking. Roast for a couple of minutes. Serve hot either by itself or with dali toye (see my recipe).

Enjoy!!!

Notes:

     1)    If you do not like to bite on small bits of ginger, chili and coconut, you can grind the coconut paste a bit longer till it is smooth.

     2)    Tariyé bakri or rava pathiri is an ideal tasty meal for diabetic patients since cold wheat semolina contains more fibre and less starch when compared to rice.

     3)    Dali toye can provide the necessary proteins and make it a soupy, slurpy, delicious meal.

Thursday 29 March 2012

250) AMBYA UMMAN


AMBYA UMMAN
A SWEET KONKANI RIPE WILD MANGO
SOUPY CURRY DESSERT

Introduction:

          Since time immemorial, huge mango trees have been growing all over the plains, foothills and plateaus of India. In summer, these trees produce luscious mangoes in great abundance, shedding the ripe fruit every day on the ground. The birds, squirrels and bats feed to their hearts content but they are able to polish off only a portion of the bounty, leaving the rest for humans to enjoy.
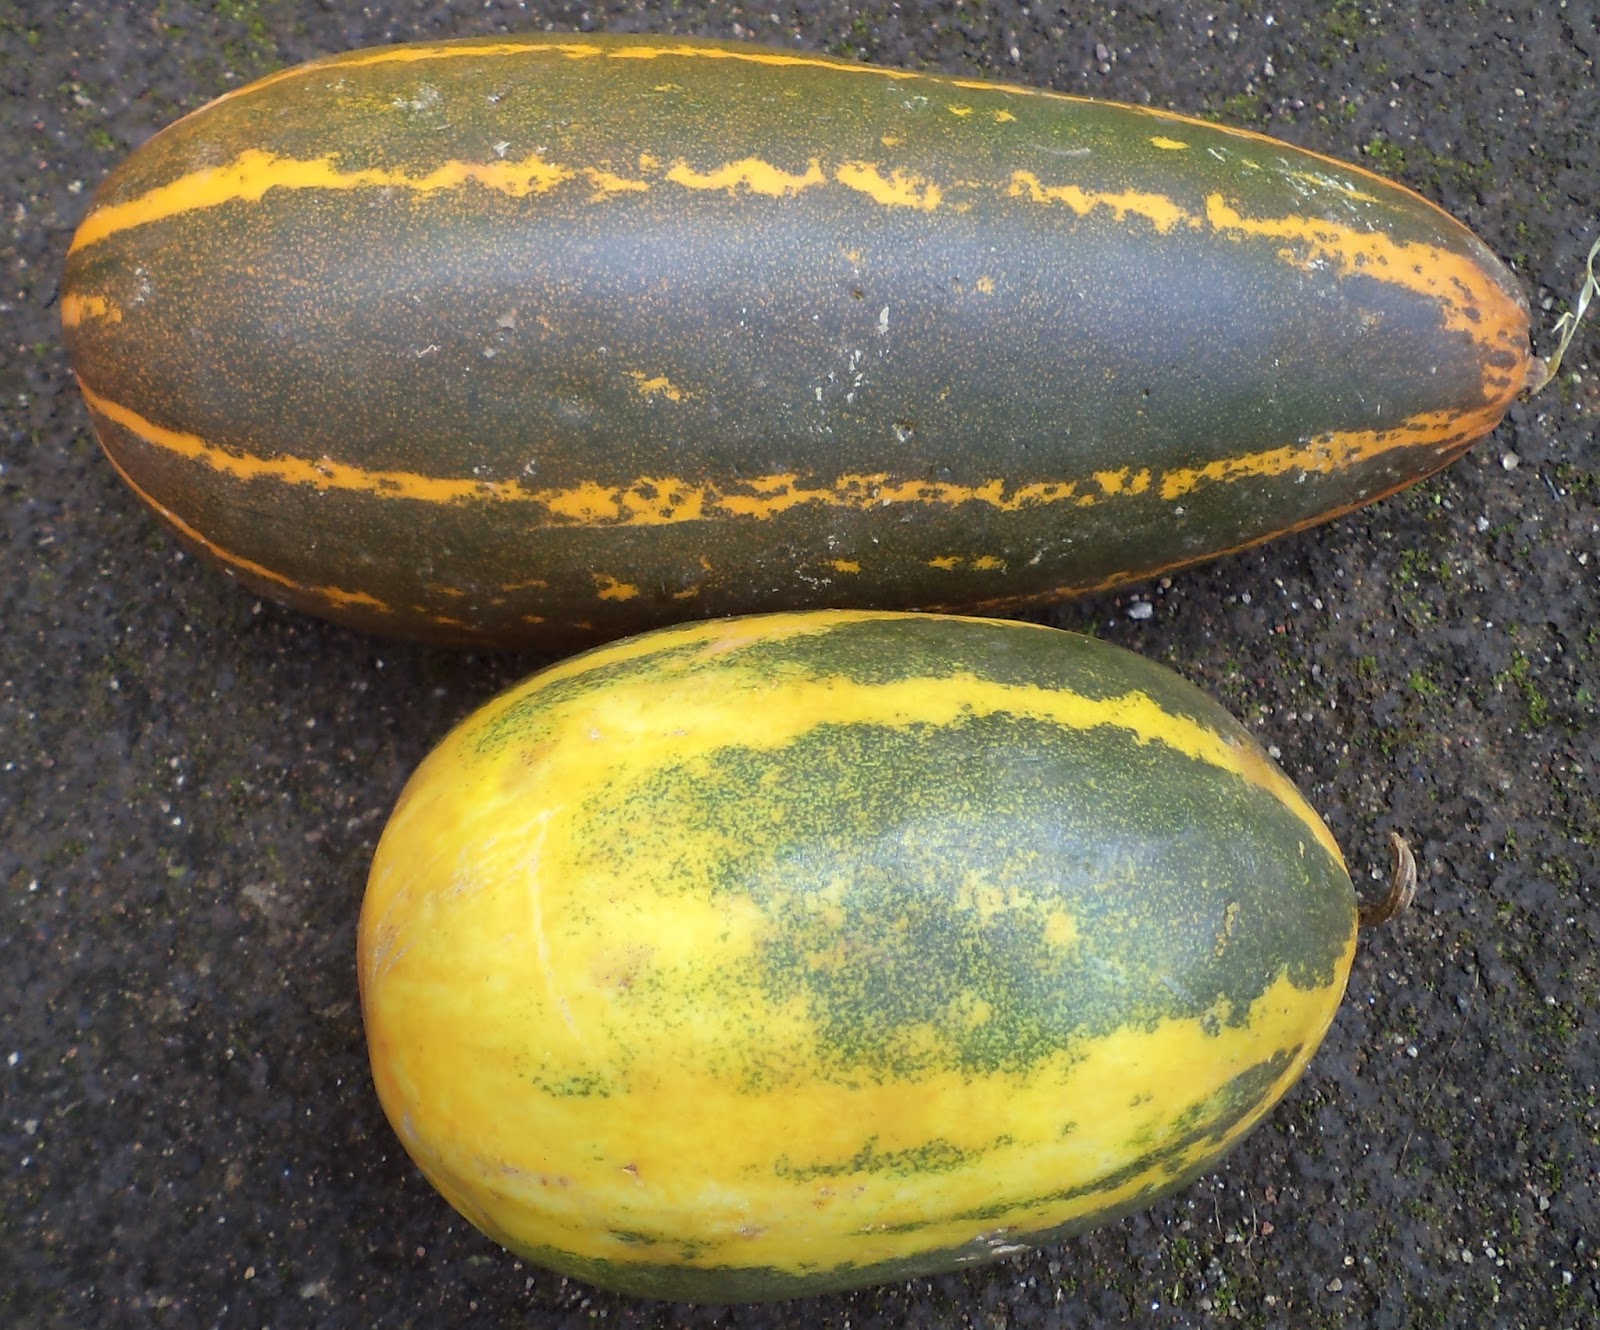
          These wild mangoes, unlike the hybrid commercial cultivars, are generally smaller in size, have fibrous pulp and pack a punch in terms of flavor. It is these wild mangoes that the Konkani people love to turn into delicious, lip smacking ambya umman.

          Some of the smallest varieties are just a trifle bigger than a lime, have thinner skin, are lemon yellow inside and have indefatigable flavor. Alas! Man’s greed for valuable timber has resulted in the loss of a great many of these centuries old patriarchs among mango trees.

          Ambya umman is served as a dessert in most Konkani feasts during the mango season. Even little children can be seen joyously tucking away 5 or 6 mangoes at a sitting. I am sure you too will love ambya umman.


Ingredients:

     1)    Fully ripe wild mangoes – 2 Kg.
     2)    Jaggery (unrefined cane sugar) – 400 gm.
     3)    Sugar – 1 tablespoon
     4)    Salt – 1¼ teaspoon
     5)    Dry hot red chilies – 6 Nos.
     6)    Curry leaves – 2 sprigs
     7)    Mustard seeds – ½ teaspoon
     8)    Fenugreek seeds – ½ teaspoon
     9)    Urad dal (split black gram lentils) – 1 teaspoon
     10)     Coconut oil – 2 teaspoons
     11)     Rice powder or corn starch – 1 tablespoon

To Cook:

          Wash the mangoes nicely. If any sticky grime is present, immerse in a solution of 20 ml. of vinegar in a litre of water for 5 minutes. Scrub and wash. Rinse in clear water. Pull off the mango peel with your fingers and set the peel aside in a bowl. Put the peeled mangoes into a pan or any other cooking vessel.

          Pour a couple of glasses of water over the mango peel in the bowl and squeeze nicely with your fingers to release the flavor from the peel. Pour the peel juice (after discarding the peel) over the mangoes and set the vessel on high heat. Tip in the salt. As soon as it comes to a boil, lower the heat and cook till the mangoes become soft.

          Meanwhile, put the jaggery and the sugar into a pan. Pour in 100 ml. of water and set on low heat. Stir till the jaggery is fully melted. The mangoes must have cooked by now. Sieve the melted jaggery and tip it in. stir nicely and turn up the heat. Let the curry boil for 4 minutes. Mix the rice powder or the cornstarch vigorously with 100 ml. of cool water and tip it in. Stir for a minute or two for the curry to thicken and then switch off the heat.

          Break each red chili into 2 or 3 pieces. Pull the curry leaves off their sprigs and set aside. Set a small pan on low heat. Pour in the coconut oil and throw in the mustard seeds. As soon as the mustard seeds are about to finish crackling, tip in the urad dal. Stir till it turns a light brown in colour. Now tip in the fenugreek seeds. Stir twice and chuck in the broken red chilies and the curry leaves. Stir twice or thrice and tip over the entire contents of the pan into the mango curry. Stir and cover with a lid.

          Your ultra-delicious ambya umman is ready to serve. Serve hot or cold either by itself or as welcome dessert to a meal. Bite in to the juicy flesh of the mangoes. Dip the fibrous mango stone in the curry sauce and suck it in together with the flesh sticking to the fibres. Repeat again and again. You are in heaven! Do try this recipe for sure!!!

Notes:

     1)    If wild mangoes are not available, simply use any other mango. Larger unpeeled mangoes can be cut to pieces and used. Tangy mangoes are great for this curry.

     2)    You can adjust the quantity of jaggery and sugar to suit your taste.

     3)    Rice powder is used as the thickener in the traditional recipes. However, you will find that corn starch (or corn flour as it is called in India) does just as well or even better.

     4)    The peel juice enhances the flavor of the ambya umman.

     5)    Please do not serve tiny mangoes to smaller kids to avoid the danger of suffocating on the stones.

Saturday 17 March 2012

249) CHILLED SWEETENED CUCUMBER

CHILLED SWEETENED CUCUMBER
MOGGÉ KANTHILÉ
A KONKANI SUMMER RELIEF
Ingredients:

     1)    Fully mature Indian curry cucumber (‘vellarikka’ in Malayalam, ‘moggé’ in Konkani) – 2 or 3 large ones
     2)    Jaggery – 500 gm.
     3)    Cardamom – 5 or 6 pods

To Make:

          Peel the cucumbers. Cut lengthwise into 4 quarters and cut out and discard the seed core. Grate the cucumber pieces and set aside. Set a small vessel on low heat.  Pour in 50 ml. of water and tip in the jaggery. Stir occasionally till the jaggery is fully melted. Switch off the heat. Sieve the melted jaggery (to remove particles of sand, if any).

          Once the melted jaggery has cooled, pour and mix in just enough jaggery into the grated cucumber to bring it to your desired sweetness. Children like it sweeter.

          Cover the vessel and keep it in the refrigerator to chill for an hour or two. When it is time to serve, shell the cardamoms and crush the seeds to powder. Take out the chilled sweetened cucumber from the fridge and tip in the fragrant cardamom powder. Mix nicely and serve in large bowls.

          In burning summer, it is a welcome delight for everyone, especially children, to eat the grated cucumber and to drink the nectar-like juice which oozes out.

Tip:

          Even though jaggery is compulsory in the original Konkani dish, you can try out honey in place of jaggery but avoid the cardamom as honey has its own natural fragrance.

Friday 16 March 2012

248) CHILI PRAWN FRY


CHILI PRAWN FRY


Ingredients:

     1)    Shelled and cleaned prawns – 500 gm.
     2)    Coconut oil or any other cooking oil – 1½ tablespoons
     3)    Mustard seeds – ½ teaspoon
     4)    Onions – 300 gm.
     5)    Ginger – 1 inch piece
     6)    Garlic – 1 pod
     7)    Tangy tomatoes – 250 gm.
     8)    Tender curry leaves – 3 sprigs
     9)    Hot green chilies – 2 Nos.
     10)     Hot red chili powder – 2½ teaspoons
     11)     Turmeric powder – ½ teaspoon
     12)     Coriander powder – 1½ teaspoons
     13)     Fenugreek seeds – ¼ teaspoons
     14)     Water – 200 ml.
     15)     Salt – 1½ teaspoons
     16)     Coriander leaves of one plant (optional for garnish)

To Cook:

          Peel the onions, the ginger and the garlic. Chop the onions and the ginger to fine pieces. Cut the tomatoes roughly to big pieces. Slit the green chilies lengthwise on one side. Pull the curry leaves from their sprigs and set aside. If you are using coriander leaves for garnish, chop finely and set aside.

          Set a wide wok on high heat. Pour in the cooking oil and throw in the mustard seeds. As soon as the mustard seeds are about to finish spluttering, tip in the fenugreek seeds. Stir twice and tip in the chopped onions, the ginger, the garlic cloves and the green chilies.

          Sprinkle the salt and stir till the onions turn a golden brown. Now tip in the chili powder, the turmeric powder and the coriander powder. Stir once or twice and pour in the water. Now tip in the prawns and the tomato pieces. Once it comes to a boil, turn down the heat. The prawns will turn opaque and whitish when they are cooked.

          If you wish to have your chili prawn fry with loose gravy, turn off the heat and garnish (optional) with the coriander leaves. If you like to have your dry chili prawn fry, turn up the heat and stir till the excess moisture evaporates. Garnish (optional) and serve hot with a heap of soft parboiled rice or with hot porottas, chappatis, vellappams, thick dosas, pathiris or with freshly baked bread.
Enjoy!!!


Note:

          It is better to use smaller prawns for superior taste while making chili prawn fry. Fresh prawns taste far better than frozen ones.

Thursday 15 March 2012

247) DATE TEMPURA

DATE TEMPURA
SIMPLE TO MAKE, HEALTHY TO EAT


Ingredients:

     1)    Dates without seeds – 300 gm.
     2)    Maida (refined white wheat flour) – 200 gm.
     3)    Corn flour (corn starch) – 50 gm.
     4)    Powdered salt – ½ teaspoon
     5)    Any cooking oil – to deep fry

To Make:

          Put the salt and both the flours into a food processor. Pour in a little water and blend nicely to form a batter which is a bit thicker than pancake batter.

          Set a wok on high heat. Pour in the cooking oil. As soon as the oil is hot, but before it smokes, dip the dates one by one in the batter so that the batter sticks all around. Gently slip them into the hot oil. Put in only enough dates to deep-fry comfortably (if you overcrowd the wok, the batter jackets will stick together). Gently flip over and fry till the jackets are a light brown in colour. Lift out and drain off all the excess oil.

          Serve warm or cold. Date tempura is a delicious must-be-tried snack which is quite simple to make and healthy to eat. You can also make tastier and more nutritious date n’ walnut tempura using the same batter.


DATE N’ WALNUT TEMPURA

          Slit the dates on one side only and remove the seeds. Carefully insert some walnut kernel pieces in the cavity and press the opening closed. Dip in the batter and deep-fry as before. Dates and walnuts complement each other perfectly and make a super snack.

Note:

          The process of blending the flour in the food processor makes the batter airy and the jacket soft and fluffy. You get the same effect as you would while using baking powder in the tempura batter. It is of course healthier to avoid the use of baking powder wherever possible.

Sunday 11 March 2012

246) HOT N’ SWEET GINGER CANDY


HOT N’ SWEET GINGER CANDY
SPECIAL HOT N’ SWEET THROAT LOZENGES
Ingredients:

     1)    Fibrous ginger solids, set aside while making hot n’ sweet ginger syrup (see my recipe) – 500 gm. (approx.)
     2)    Sugar – 500 gm.
     3)    Jaggery (unrefined cane sugar) – 500 gm.
To Make:

          Put the sugar and the jaggery into a thick vessel. Pour in 50 ml. of water and set on low heat. Stir till the jaggery and the sugar are fully melted. Put the ginger solids into a thick, wide wok. Sieve the melted jaggery-sugar liquid and pour it in. Set the wok on high heat. Use a thin, flat ladle to stir the mixture continuously. Take care not to let the mixture burn at the base. You may need to stir for around 30 to 40 minutes to get rid of all moisture.
          You can notice the mixture turning whitish and translucent as you stir and turn it over. This means that the candy is ready to set. Switch off the heat. Put a sheet of butter paper on a wooden table. Scoop up the mixture with the ladle and place it all at the center of the butter paper. Put another sheet of butter paper on top of the mixture. Use a rolling pin to flatten the mixture to a thickness of around 1 cm. Peel off the butter paper from the top of the candy. Use a strong, sharp knife to cut the candy to pieces of any shape you like while it is still warm and soft. Spread out the bits on a platter to cool. When cool, transfer to an airtight glass jar.
          Your hot n’ sweet ginger candy will keep for months at room temperature.
Enjoy!!!
Note:

          Although it is possible to make nice ginger candy using just the concentrated ginger juice, I have intentionally selected the fibrous solids of the ginger for health reasons as well as for thrift since it takes a lot of patient time and effort to peel a kilo of ginger. Moreover, the balance of sugar and jaggery makes the candy softer and tastier than when one uses sugar alone. The fact that you are using fibrous ginger solids devoid of most of the juice also saves a lot of time in the cooking process. It is a comfort to carry with you hot n’ sweet ginger candy when you have a cold or a sore throat as it gives you both a hot as well as a soothing feeling at the same time. Sucking on a candy or two after a heavy meal will aid digestion.

245) GINGER SYRUP


HOT N’ SWEET GINGER SYRUP (FOR ADULTS)


TO MAKE HOT N’ SWEET GINGER JUICE,
HOT N’ SWEET GINGER LASSI,
HOT N’ SWEET GINGER TEA &
HOT N’ SWEET GINGER COFFEE

Ingredients:

     1)    Peeled ginger – 1 kg.
     2)    Sugar – 2½ kg.
     3)    Water – 1 litre

To Make:

          Chop the ginger roughly to bits. Grind the ginger in batches in your food processor by adding a little of the water to each batch to make a fine paste. Use a fine sieve to squeeze out all the juice. If any water is remaining, soak the ginger solids again and use the sieve to squeeze out the final drop of juice.

          Do not throw away the fibrous ginger solids, but set aside to make nice hot n’ sweet ginger candy (see my recipe). Transfer the ginger juice to a 5 litre stainless steel vessel and set on high heat. Tip in the sugar and stir continuously till all the sugar is dissolved. Once it boils nicely, switch off the heat and cover with a lid. When cool, transfer the hot n’ sweet ginger syrup to clean, sundried, airtight glass or polyethylene bottles and store in the refrigerator.


To make hot n’ sweet ginger juice:

          Simply pour half an inch of hot n’ sweet ginger syrup into a glass or a tumbler. Top up with ice water or ice soda. Add a dash of fresh lemon juice or lime juice. Stir well and enjoy!


To make hot n’ sweet ginger lassi:

          Pour around half an inch of hot n’ sweet ginger syrup into a glass or a tumbler. Top up with ice-cold, diluted, slightly sour butter milk. Add a dash of fresh lemon juice or lime juice. Stir nicely and enjoy!


To make hot n’ sweet ginger coffee:

          Prepare hot black coffee, pour in enough hot n’ sweet ginger syrup to bring to the desired sweetness, stir and drink hot. You will get good relief from a sore or itchy throat and also from cold.


To make hot n’ sweet ginger tea:

          Prepare hot black tea (weak tea or ‘light tea’ as it is called in India is better). Pour in enough hot n’ sweet ginger syrup to get your preferred sweetness. Squeeze in a dash of fresh lime juice or lemon juice, stir and sip hot. Hot n’ sweet ginger tea will help you control diarrhea, get good digestion and also soothe your throat. The combination of ginger, lime, sugar and tea is excellent medicine for a queasy or upset stomach.

Notes:

     1)    You can vary the volume of ginger syrup to create the right sweetness for your palate. So also, you can dilute the thick buttermilk with water to capture the right balance of sourness and hot sweetness when you make hot n’ sweet ginger lassi.

     2)    I have used ginger grown in the hills of Wayanad to make this syrup since Wayanadan ginger is of exceptionally high quality, both in terms of flavor and heat as well as in its medicinal quality. Ginger helps soothe your throat and improves digestion. Ginger also helps relieve pain in the gonads of adolescent boys who are going through the process of puberty. Fresh peeled ginger is chewed and its juice is sucked slowly as a traditional home remedy.

     3)    People suffering from stomachache, traditionally take ginger juice as a home remedy. The peeled ginger is crushed with a little bit of salt in a mortar. Some fresh lime juice is added to the ginger juice and is gulped down for relief.

     4)    Please do not force small children to drink hot n’ sweet ginger juice as it is too hot for them.

     5)    An Appeal: Last year, ginger was in great demand and fetched a nice price. This year, too many farmers cultivated ginger in Kerala and in Karnataka. Consequently, the wholesale price has come down to just rupees 5 per kilo (less than 5 U.S. cents a pound). The farmers, therefore, are unable to meet even the cost of digging up the produce and a few suicides have also taken place. So dear viewers, do try to consume more ginger this season and help the poor farmers. Moreover, you can make and store lots of ginger syrup now when ginger is so cheap and use it all round the year.

Friday 9 March 2012

244) VAALI PATRODO


VAALI PATRODO
THE EASIEST OF PATRODOS


Introduction:

          ‘Vaali’ in Konkani or ‘Basala’ in Kannada or ‘Vashala Cheera’ in Malayalam is a creeper amaranthus with thick fleshy leaves which turn slippery when cooked. Vaali comes in green and red shades and is easily propagated through seeds and stem cuttings. Hardy and relatively free of pests, vaali can also be grown to adorn your garden for its ornamental beauty. The leaves and stems are used to create several delicious dishes; the most outstanding among them being vaali ambat (see my recipe). Vaali patrodo is a comparatively easy dish for patrodo lovers (see my other patrodo recipes – patrodo version ‘A’, patrodo version ‘B’ and mooga patrodo).

Ingredients:

     1)    Freshly picked Vaali leaves – 400 gm.
     2)    Raw rice – 200 gm.
     3)    Tor dal (split pigeon pea lentils) – 200 gm.
     4)    Hot red chili powder – 4 teaspoons.
     5)    Asafoetida powder – ¼ teaspoon
     6)    Mature cucumber tree fruit – 4 nos.
     7)    Coconut – ½
     8)    Powdered salt – 2 teaspoons
     9)    Coconut oil – to grease the plate

To Cook:

          Soak the rice and the dal together in water for an hour. Soak the vaali leaves in a solution of 30 ml. of vinegar in 3 litres of water for half an hour. This will help dislodge any sticky grime from the leaves. Rinse in 2 or 3 changes of clear water and drain.

          Grate the coconut. Cut off and discard the stem tips of the cucumber tree fruit and chop the fruit roughly to pieces. Wash and drain the rice and the dal and transfer to a food processor. Tip in the cucumber tree fruit pieces and the grated coconut. Add just enough water to grind it to superfine paste. Now tip in the chili powder, the asafoetida powder and the powdered salt and blend for a few seconds. Transfer the paste to a bowl and set aside.

          Select a deep plate or tray which will fit into the steamer. Grease the plate with coconut oil. Arrange a layer of vaali leaves upside down at the base of the plate. Take some paste in your fingers and spread it thinly over the leaves. Now arrange a second layer of leaves and cover them likewise with the paste.
          Continue the process till all the leaves and the paste are used up.
Put the plate in the steamer (do ensure that you have poured adequate water at the base of the steamer). Cover with the lid and cook for an hour on high heat. At the end of that time, open the lid and insert the point of a knife into the patrodo. If the patrodo is cooked, the knife will come clean as you pull it out. If you hear a crunchy sound when the knife enters the patrodo or if the knife is covered with paste as it comes out, it means that the patrodo needs more steaming. The steaming time will vary in accordance with the thickness of the patrodo, the fleshiness of the leaves and the pressure and volume of the steam.

          Take out when well-cooked and serve hot either by itself or with rice. Dribble some coconut oil over the patrodo and it tastes still better.

Enjoy!!!


Notes:

1)    If vaali is not available, you can use other thick and large edible leaves at your disposal. It needs to be said that edible taro leaves (see my other patrodo recipes) are the best option but sadly, tender taro leaves are not available at many places around the world and moreover, it takes a lot of patient work to remove the veins from the leaves.

2)    While making this dish, I have placed a piece of banana leaf at the bottom of the plate before arrange the vaali leaves in order to:
·       prevent the leaves from sticking to the plate and
·       to incorporate the flavor of the banana leaf into the patrodo
    Try using a few turmeric leaves at the base for a different flavor!

243) MANGO RICE


MANGO RICE
A TREAT FOR CHILDREN

Mango rice dressed with grated mango pachadi

Ingredients (for one large plate):

     1)    B.T. rice (Bombay Terminus rice or aged fine raw rice) – 200 gm.
     2)    Peeled and grated tender mango – 3 tablespoons (see note)
     3)    Hot green chili – 1 no.
     4)    Dry hot red chilies – 3 Nos.
     5)    Fenugreek seeds – ½ teaspoon
     6)    Mustard seeds – ½ teaspoon
     7)    Coconut oil or any other cooking oil – 1 tablespoon
     8)    Turmeric powder – ½ teaspoon
     9)    Tender curry leaves – 3 sprigs
     10)     Salt – 1¼ teaspoons

To Cook:

          First of all, we need to cook and drain the B.T. rice. You can either use a rice cooker or simply put the washed and drained rice in a vessel containing a litre of boiling water. Turn up the heat. As soon as the water starts boiling again, cover with a lid and switch off the heat.

          15 minutes later, open the lid and pour in a bit more water to immerse the puffed up rice. This will prevent the rice from sticking together. Switch on the heat. Once it boils again, stir well, switch off the heat and drain off all the starch (stock) and set aside. Discard the stems of both types of chilies and cut them diagonally into 2 or 3 pieces each. Pull the curry leaves off their sprigs and set aside.

          Set a wide wok on high heat. Pour in the cooking oil and throw in the mustard seeds. As soon as they are about to finish spluttering, drop in the fenugreek seeds. Stir twice and tip in the grated mango, the chilies, the curry leaves, the turmeric powder and the salt. Lower the heat and stir for a minute. Now chuck in the cooked raw rice. Stir nicely for a minute. Cover with a lid.As soon as the rice is hot, switch off the heat.

          Serve hot with mango pachadi (see my recipe). Children just love mango rice because of the mango flavor and the tanginess. Mango rice is also good to take with you as a lunch parcel. It is easily digested too.

Bon appétit!!!
Note:

          If you select a sour and fleshy raw mango weiging 300 gm, you can peel it and grate all off it up to the stone. Use 3 tablespoonsful for this recipe (if you do not want the sourness but only the mouthwatering flavor of the mango, use just 1 tablespoonful). Keep the rest of the grated mango for making mango pachadi to go with mango rice.

Follow us by Email and never miss a new recipe!