Saturday 22 October 2016

News!

Dear ones,

After getting so many suggestions from my dear friends to start a proper website, after four years of blogging on mouthwateringfoodrecipes.blogspot.com, I finally decided to take the leap, and lo! My new website kitchenarchives.com is born.


I have posted a bunch of exciting new recipes here for you and hope to put in many more in the coming days. I am sure you will love them. I request you to visit my new website frequently and to put in your valued comments.

I am ever indebted to you for all the love, support and inspiration you have given me and I look forward to sharing with you, God willing, the recipes of every delicious dish I cook at home, day after day. May god bless you all!


Here is a picture of a simple Konkani banana leaf meal. The items – clockwise from the center – are hot rice, sambar, alambya upkari (wild mushroom fry), uppata nonche (Konkani lime pickle), surna kachri (elephant foot yam chips), kooka upkari (Chinese potato roasted stir-fry), sheera (sweet Konkani semolina dessert), losuné chutney (roasted garlic chutney), deep-fried stuffed curd chilies and alambya ambat (Konkani wild mushroom curry).

Friday 14 October 2016

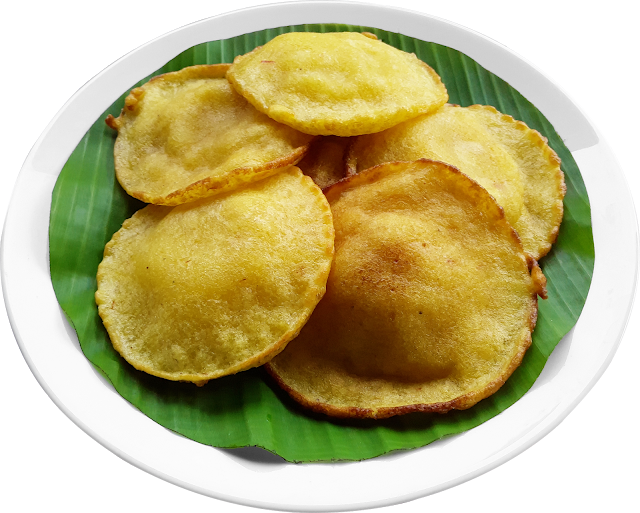
343) MALPURI

MALPURI
A DELICIOUS, SWEET, FRAGRANT KONKANI DEEP-FRIED DESSERT

Malpuri / Malpua / Malapua / Malpura Sweet Delicious Konkani Dessert

Ingredients:

     1)    Bombay rava (fine wheat semolina) – 400 gm.
     2)    Maida (white wheat flour / all-purpose flour) – 100 gm.
     3)    Sugar – 250 gm.
     4)    Milk – 500 ml.
     5)    Water – 500 ml.
     6)    Cardamom pods – 6 Nos.
     7)    Saffron – 2 pinches
     8)    Oil to deep fry (cooking oil / ghee / hydrogenated vegetable oil) – 500 ml.
     9)    Powdered sugar for dusting (optional) – 100 gm.

To prepare:

          Put a thick bottomed pan on medium heat. Tip in the rava. Stir continuously so that the rava heats up without browning or burning in the least. As soon as the rava is uniformly hot, switch off the heat (there is no need to roast the rava, but only to heat it up so that the puris become soft and fluffy without adding any baking powder or other raising agent).

Crush the cardamom and transfer to a mixing bowl. Tip in the maida, the heated rava, the sugar, the saffron, the milk and the water. Use a blender to beat the mixture thoroughly (or just grind it for 10 seconds in your food processor). Let the batter rest for 4 hours.

To make:

          Set a deep, thick cast-iron wok or non-stick wok on high heat. Pour in the cooking oil. Use a ladle (of 125 ml. capacity) to stir the batter thoroughly. As soon as the oil is hot (it should not smoke), stir the batter and pour a ladleful in the center. The malpuri will rise beautifully.

          Use a perforated spatula to splash the hot oil carefully over the risen puri. Once it rises fully, gently flip it over. A minute later, turn down the heat a bit and lift out the puri. Drain off the excess oil. Deep-fry the rest of the malpuris likewise, taking care to stir the batter each time. You may have to adjust the heat to keep the oil from overheating.

Malpuri / Malpua / Malapua / Malpura Sweet Delicious Konkani Dessert

          Serve warm or cold. They are equally delicious either way and taste even better the second day.

Enjoy!!!

Notes:

     1)    I have used just enough sugar in the batter for the perfect mildly sweet taste and softness so that you can enjoy many many more puris. If you like them sweeter, please dust the powdered sugar over the hot puris and enjoy!

     2)    If you like to have a crispy golden frill around your malpuri, just add half a cup more water to the batter. The thinner batter makes thinner puris.


     3)    The most important ingredient in malpuri which lends it its golden colour, richness and aroma is saffron. Take care to use original good quality saffron since duplicate shredded coloured paper saffron is plentiful in the market.

Tuesday 11 October 2016

342) TAUSHA CHUTNEY

TAUSHA CHUTNEY
A SIMPLE, DELICIOUS KONKANI CUCUMBER CHUTNEY
A TRADITIONAL CHUTNEY FUSION SALAD DISH SERVED IN TEMPLES


Ingredients:

     1)    Peeled tender cucumber – 170 gm.


     2)    Grated coconut – 100 gm.
     3)    Hot green chilies – 7 gm.
     4)    Peeled ginger – 5 gm.
     5)    Lemon / lime juice – 1 teaspoon
     6)    Salt – 1 teaspoon (5 gm.)

To make:

          Grate the cucumber and set aside. Chop the ginger. Put the grated coconut, the green chilies, the ginger, the lemon juice and the salt into your food processor and grind to rough paste. Take care not to add any water while grinding. Transfer to a mixing bowl.

          Tip in the grated cucumber and mix thoroughly. Your extra-delicious, healthy, lively tausha chutney is ready to enjoy. Serve fresh with chappatis, rotis, naans, porottas, dosas, appos, machkats, masala dosas or uthappams.

Try making scrumptious tausha chutney butter sandwiches or just enjoy the cucumber chutney fresh by itself.


Bon appétit!

Friday 7 October 2016

341) KONKANI TENDER BAMBOO PICKLE

KONKANI TENDER BAMBOO PICKLE
KIRLU AMBADA NONCHE


Introduction:

          Konkani kirlu ambada nonche is a supremely delicious, hot, tangy and salty tender bamboo and hog plum pickle. Traditionally, this pickle is prepared using fresh unprocessed tender bamboo pickle. You can also make the pickle using salted tender bamboo pieces (see my tender bamboo in Konkani cuisine article). While using fresh bamboo, the sap is retained and the bamboo pieces are crisp and crunchy.

          When you use salted bamboo, the pieces are soft. So too, as hog plums were not available, I have used fresh green acerola cherries which grow in our courtyard with surprising results. They are crisp, tangy and thrillingly delicious. This pickle will truly sweep you off your feet!

Ingredients:

     1)    Kirlu (fresh tender bamboo, Mulankoombe in Malayalam) pieces or juliennes – 300 gm. 
     2)    Green acerola cherries – 200 gm. OR fresh tender hog plums – 200 gm.


     3)    Mustard (preferably sun-dried for 2 hours) – 50 gm.
     4)    Dry Kashmiri chilies (preferably sun-dried for 2 hours) – 25 gm.
     5)    Dry hot red chilies (preferably sun-dried for 2 hours) – 25 gm.
     6)    Asafoetida powder – 2 gm. (½ teaspoon)
     7)    Salt – 50 gm.
     8)    Water – 500 ml.

To make mitta paej (brine):

          Put the salt and the water together in a vessel and set on the stove. Stir till the salt dissolves. Boil for 5 minutes and switch off the heat. Let cool naturally.

To make the pickle:

          Put the mustard into the dry grind jar (preferably sun-dried) of your food processor, grind to fine powder and set aside. Put both the chilies together with the brine into the wet grind jar (preferably sun-dried) of your food processor and grind to superfine paste in 2 or 3 batches. Transfer to a clean, dry mixing bowl.

Tip in the mustard powder, the asafoetida powder, the acerola cherries (or the hog plums) and the bamboo pieces. Mix thoroughly with a clean dry ladle. Transfer the pickle to a sun-dried airtight jar. Close the lid and store in a cool, dry place to rest for 5 to 7 days. Your delicious Konkani kirlu ambada nonche (in this case, kirlu cherry nonche) is ready to eat. Enjoy with rice, roasted idlis, machkats, nuchi, undis, soyyea polos or with shevai.


Bon appétit!

Notes:

     1)    Take care to refrigerate the pickle once you start using it. Always use a clean, dry spoon.


     2)    The ingredients and utensils are sun-dried to remove unwanted moisture and to gain a longer shelf-life.

Sunday 2 October 2016

340) VEGETABLE PUTTE (PUTTU)

VEGETABLE PUTTE (PUTTU)
A TRADITIONAL KERALA STEAMED BREAKFAST DISH MADE EVEN HEALTHIER AND TASTIER, HOT AND SPICY

Vegetable Puttu

Ingredients:

     1)    Putte podi (roasted raw rice powder) – 500 gm.
     2)    Grated coconut – 125 gm.
     3)    Peeled potato – 175 gm.
     4)    Peeled beetroot – 300 gm.
     5)    Peeled carrot – 150 gm.
     6)    Onion – 50 gm.
     7)    Hot green chilies – 15 gm.
     8)    Coriander leaves – 10 gm.
     9)    Curry leaves – 2 sprigs
     10)    Powdered salt – 12 gm.
     11)    Garam masala powder – 3 gm.

To prepare:

          Grate the potatoes, the beets and the carrots. Chop the onion, the green chilies, the coriander leaves and the curry leaves to superfine pieces. Transfer to a mixing bowl. Tip in 25 gm. of the grated coconut. Add the rice powder (putte podi), the powdered salt and the garam masala powder. Mix well with your fingertips and set aside.

To steam:

Puttu Kutti components and parts labeled.

          Fill three fourth of the putte steamer with water, cover with its lid and put it on high heat. Place the perforated disc at the bottom of the putte kutti (cylinder).

 Putte Kutti
Putte / Puttu Kutti

Tip in a couple of teaspoons of grated coconut. Fill a third of the cylinder with a vegetable rice mixture. Tip in a teaspoonful of grated coconut and fill up another third of the cylinder with the mixture. Repeat with grated coconut and the mixture once again till the cylinder is full. Top up with a teaspoonful of grated coconut. Take care never to press the mixture for the steam has to pass through freely. Put on the perforated lid and set the cylinder on the putte steamer which should be boiling by now. In 2 to 4 minutes, the steam will start coming out at the top. Keep for a minute longer, turn down the heat and lift up the cylinder. Remove the lid. Keeping the cylinder horizontally over a plate, insert the steel rod into the bottom of the cylinder and gently push your delicious steaming hot vegetable putte onto the plate. Enjoy hot. You need no other accompaniment for this healthy dish. Hungry kids coming back from school just love to gobble up this putte. So does everyone else!

Vegetable Puttu

Enjoy!!!

Note:

          The moisture from the vegetables is just right to make the putte, so long as you are steaming it immediately after mixing. If, however, you take an hour or more to start steaming the putte, you may need to sprinkle a few drops of water and mix again, since the rice flour tends to absorb water, rendering the mixture too dry to bind properly.

339) GODDA POVU

GODDA POVU
SWEET MELTED JAGGERY BEATEN RICE
A SIMPLE, INCOMPARABLY DELIGHTFUL TRADITIONAL KONKANI DISH


Introduction:

          Most Konkani people are accustomed to eating godda povu. As it is prepared on nearly all auspicious occasions, I had always enjoyed having godda povu right from my early memories of childhood. Later, when I got married, I tasted godda povu prepared by my mother-in-law with such a delightful surprise, as it was so much better than any I had ever had before. She would make tons of it and as I gobbled it up in raptures, I couldn’t help feeling that this is the world’s most delicious godda povu. No Navaratri is complete without having this simple, scrumptious dessert. Here is the special recipe for you. Do make and enjoy!

Ingredients:

     1)    White thin beaten rice flakes – 250 gm.


     2)    Grated coconut – 250 gm.
     3)    Jaggery (unrefined cane sugar) – 300 gm.


     4)    Sugar – 25 gm.
     5)    Cardamom – 6 pods
     6)    Ghee – 15 ml. (1 tablespoon)
     7)    Water – 50 ml.

To make:

          Put the rice flakes and the grated coconut together into a bowl. Mix thoroughly and set aside for the rice flakes to soften. Shell the cardamom. Crush to powder and set aside.

Put the jaggery in a small pan. Pour in the water and set on low heat. Stir occasionally till it melts fully. Sieve the melted jaggery into a wide, thick-bottomed pan or a shallow, copper-bottomed steel vessel. Set on high heat. Stir till the melted jaggery thickens and becomes gummy. Tip in the coconut rice flake mixture and stir. Lower the heat and keep stirring for 5 minutes (in order to heat up the mixture fully). Tip in the sugar, the ghee and the cardamom powder. Mix thoroughly and switch off the heat. Your delicious godda povu is ready to enjoy.

Serve hot or cold. Enjoy godda povu by itself or just mash in a few small ripe bananas (fragrant, sweet and sour Palayankodan or Mysore poovan is best, but any small yellow skinned banana will do) as you eat. Godda povu, when well heated during its preparation, will stay fresh at room temperature, when kept (after it is cool) in airtight jars for 3 to 4 days.

Bon appétit!

Tip:


          Curd lovers can soak a cup of godda povu in fresh curd for half an hour and enjoy, gourmet style.

Tuesday 27 September 2016

338) KHARKHARI BAKRI / BHAKRI

KHARKHARI BAKRI
A SCRUMPTIOUS, FLAVOURSOME KONKANI BLACK GRAM PANCAKE


Introduction:

          I can never forget the taste and texture of the yummy kharkhari bakris my mother would make in the morning for us hungry kids. Often, the aroma of roasting bakris wafting from the kitchen would bring us scrambling to the dining table together with our father, where we would sit dipping hot pieces of fresh bhakris in curd chili chutneys or in salted dry chili chutneys, munching, our faces shining in joy. This high protein, balanced carb dish is a must-be-eaten breakfast for all food lovers, so delicious and healthy. Do cook and enjoy!

Ingredients (for a dozen bakris):

     1)    Urud (whole or split black gram with skin) – 200 gm.


     2)    Raw rice – 200 gm.
     3)    Grated coconut – 100 gm.
     4)    Cumin seeds – 2 gm. (⅓ teaspoon)
     5)    Pepper corns – 2 gm. (½ teaspoon)
     6)    Salt – 7 gm. (1½ teaspoons)
     7)    Water – 400 ml.
     8)    Cooking oil – to grease the pan

To prepare:

          Soak the black gram and the rice together in water for an hour. Wash well, drain and grind to coarse paste, after mixing in the rest of the ingredients except the cooking oil (though traditionally kharkhari bhakri batter is ground in old fashioned granite wet grinders for unmatched taste and texture, I have used the food processor for ease). Grind to paste in 2 or 3 batches, taking care to keep the batter a bit coarse for texture. Transfer to a vessel and mix up the batter thoroughly.

To make:

Set a thick cast-iron pan on high heat. As soon as the pan is hot, pour in a teaspoonful of cooking oil and spread it over the pan. Now tip in a ladleful (150 ml.) of batter at the center. Use the bottom of the ladle to spread the batter to a semi-thick, round bakri. Cover with a cloche and lower the heat.

Wait for 5 minutes before opening the cloche. Dribble a teaspoonful of cooking oil over the bakri and flip it over. Let the bakri roast for 5 more minutes. Serve hot with curd chili chutney or with coconut chutney or with ekpanni chutney or with any Konkani pickle.

Kharkhari Bakri with Curd Chili Chutney


Bon appétit!

337) CURD CHILI CHUTNEY

CURD CHILI CHUTNEY
A SIMPLE KONKANI GOURMET DIPPING CHUTNEY
ONE OF THE TASTIEST OF COCONUT CHUTNEYS


Ingredients:

     1)    Grated coconut – 100 gm.
     2)    Dry Kashmiri chilies – 3 gm.
     3)    Tamarind – 3 gm.
     4)    Salt – 5 gm. (1 teaspoon)
     5)    Drinking water – 250 ml. (1 cup)
     6)    Coconut oil – 15 ml. (1 tablespoon)
     7)    Mustard seeds – 2 gm. (½ teaspoon)
     8)    Dry curd chilies – 10 gm.


     9)    Asafoetida powder – 1 gm. (¼ teaspoon)
     10)    Curry leaves – 1 sprig

To make:

          Put the grated coconut, the dry Kashmiri chilies, the tamarind, the salt and the drinking water into your food processor and grind to superfine paste. Transfer to a serving bowl.


Set a skillet or small pan on low heat. Pour in the oil and tip in the mustard seeds. As soon as the mustard seeds are about to finish popping, tip in the curd chilies. Stir continuously till the chilies turn a uniform dark brown. Now tip in the asafoetida powder. Quickly pull the curry leaves off their sprig and throw them in. Stir just twice or thrice and switch off the heat. Pour the contents over the chutney in the serving bowl. Mix well and serve with hot kharkhari bakris, dosas, machkats, uthappams or idlis. As you eat, remember to crumble a curd chili into the chutney. Tuck in and enjoy!

Curd Chili Chutney with Kharkhari Bakri


Bon appétit!

Follow us by Email and never miss a new recipe!