Saturday 31 December 2011

175) MODAK


MODAK
SWEET INDIAN RICE DUMPLINGS


Ingredients:

     1)    Roasted rice powder – 500 ml.
     2)    Salt – ½ teaspoon
     3)    Water – 500 ml.
     4)    Coconut oil – 2 teaspoons
     5)    Choorne of one large coconut (see my previous recipe)


To Make:

          Set a wide wok on high heat. Pour in the water and the coconut oil. Tip in the salt. As soon as it comes to a boil, tip in the rice powder. Stir well with a flat ladle. Cover with a clean lid and switch off the heat.

          After 30 minutes, open the lid carefully, dribbling the condensed steam from the lid onto the dough. Knead the dough nicely and make lime sized balls.


          Flatten a ball into a thin patty with your fingers. If the dough sticks to your fingers, grease them with a little coconut oil or dust a bit of flour.
Put a teaspoonful of choorne in the middle of the patty.


          Gather the edges together and press to make a ball shaped somewhat like a garlic pod or in any other shape of your choice. Steam for 10 minutes and serve either hot or cold. Children and adults alike love modak.


Notes:

     1)    If a steamer is not available, use a wok with 1½ inches of water. Place a perforated plate or a flat bottom colander tightly above the water line. Arrange the modaks on the plate or on the colander and cover with a lid. The heat of the steam is quite enough to cook the rice jacket.

     2)    Traditionally, modak is prepared and offered to Ganapathi, the elephant God of the Hindus who is considered to be the destroyer of obstacles and the harbinger of auspiciousness. Modak is the favorite food of Ganapathi.

     3)    If you wish to make your own rice powder, see my putte recipe.

     4)    I have given the measure of rice powder not in grams but in millilitres because both the rice powder as well as the water needs to be of equal volume to get the right consistency. However, if the rice powder is too wet, you can dust a bit more powder and if it is too dry, you can sprinkle a few drops of water.

     5)    If you are buying roasted rice powder from the market, it is better to buy pathiri podi rather than putte podi.

174) CHOORNE


CHOORNE
A SPECIAL SWEET COCONUT JAGGERY FILLING


Ingredients:

     1)    Fresh big coconut – 1
     2)    Jaggery (unrefined cane sugar) – 100 gm.


     3)    Sugar – 1 tablespoon
     4)    Cardamom pods – 4 Nos.
     5)    Ghee (clarified butter) – 1 tablespoon

To Cook:

          Set a small vessel or pan on low heat. Tip in the jaggery and the sugar. Pour in 25 ml. of water. Stir till the jaggery is fully melted. Sieve and set aside. Shell the cardamom seeds and crush them to powder. Set aside. Grate the coconut.

          Set a medium sized wok on the stove. Pour in the melted jaggery. As soon as it comes to a boil, turn down the heat and let it thicken a bit. Stir frequently to avoid burning at the base. After 5 minutes, tip in the grated coconut and the cardamom powder. Turn up the heat and stir continuously till all the water has evaporated.

          Now tip in the ghee. Stir well and switch off the heat. Your choorne is ready. You can use choorne as a beautiful filling for ultra-delicious modak and patholi. You can also have choorne with soyyea polo.

          Another nice way to enjoy choorne is to mix it with rice flakes and ripe banana slices. Yet another method for curd lovers is to put a generous dollop of choorne together with a fistful of rice flakes in a bowl of fresh curd. Mix up and enjoy!!!


Notes:

     1)    If you have a very sweet tooth, use 250 gm. of jaggery in the recipe.

     2)    In Mangalore (a city on the southwest coast of Karnataka, India), rolled soyyea polos with choorne filling are available in certain hotels and are called paan polo.

     3)    Traditional choorne contains only coconut, jaggery and cardamom. In my recipe, I have incorporated sugar and ghee to obtain the best flavor and taste.

173) MATHI MULAKITTATHE


MATHI MULAKITTATHE
A KERALA CHILI SARDINE EASY TO MAKE CURRY


Ingredients:

     1)    Sardines (young or full grown) – 1 kg.


     2)    Hot red chili powder – 2½ teaspoons
     3)    Hot green chilies – 4 Nos.
     4)    Ginger – 1 inch piece
     5)    Tomatoes – 200 gm.
     6)    Onion – 200 gm.
     7)    Tender curry leaves – 2 sprigs
     8)    Turmeric powder – ¾ teaspoon
     9)    Tamarind – a gooseberry sized bit (1 inch diametre)
     10)     Coconut oil – 2 teaspoons
     11)     Salt – 1½ teaspoons

To Cook:

          Soak the tamarind in 100 ml. of water. Peel and finely chop the ginger. Chop the tomatoes and the onion (you can chop to any size in the style of your choice). Slit each of the green chilies lengthwise on one side. Select a vessel for the curry and tip in the chopped vegetables together with the ginger and the chilies. Put in the chili powder, the turmeric powder, the salt and the curry leaves.

          Squeeze the tamarind nicely with your fingers. Sieve the tamarind juice and pour it in the vessel. Set aside.

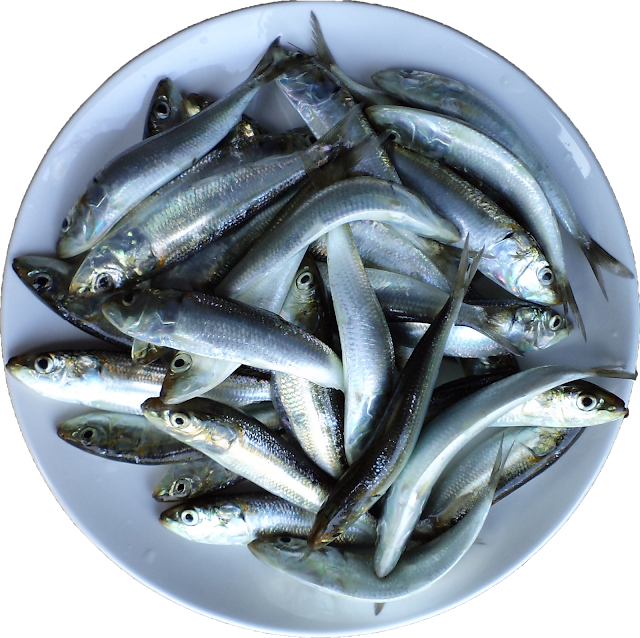
          Scrape off the scales of the sardines. Cut off the head, the fins and the tail. Pull out the guts. If you are cooking mature sardines, collect the roe (egg sack) and the milt (soft roe of male fish) for including in the curry. Soak the fish in a solution of 30 ml. of vinegar in 1500 ml. of water for 20 minutes. This will get rid of all the gall and dirt from the inside of the fish as well as remove strong smells if any. Wash in 2 or 3 changes of clear water, drain and tip the fish into the vessel with the vegetables.

          Pour in enough water to immerse the sardines. Set the vessel on high heat. As soon as it comes to a boil, turn down the heat. Taste and add more salt if required. After boiling, cook for just 5 minutes on low heat. Stir only with a lightweight ladle to avoid bruising the fish. Dribble in the coconut oil and switch off the heat.

          Cover with a lid and let the curry rest for at least an hour. Serve with a heap of rice.

Enjoy!!!


Notes:

1)    You can make meen mulakittathe (fish chili curry) not only with sardines but with any other fish, shellfish or crustaceans too.

2) Mathi mulakittathe (sardine chili curry) and Ayala mulakittathe (mackarel chili curry) are sold in most teashops and hotels all over Kerala.

3) Meen mulakittathe (fish chili curry) always tastes best after resting for 5 or more hours.

4) Most Keralite peasants love to eat meen mulakittathe with breakfast, lunch and supper since it is healthy, tasty, cheap and easy to prepare.

5) If thicker gravy is desired, you can add some fresh tomato paste at the time of adding water to immerse the sardines.

172) CHEERA TORAN


CHEERA TORAN
A TASTY KERALA AMARANTHUS SIDE DISH


Ingredients:

     1)    Red or green Amaranthus (a plant called cheera used in place of spinach in Kerala) – 500 gm.


     2)    Fresh coconut – ½
     3)    Hot green chilies – 2 Nos.
     4)    Onion – 200 gm.
     5)    Salt – 1 teaspoon
     6)    Coconut oil – 1 tablespoon
     7)    Mustard seeds – ½ teaspoon
     8)    Split black gram lentils (urad dal) – 1 teaspoon
     9)    Curry leaves – 2 sprigs

To Cook:

          Cut off the roots and hard stem, if any, from the Amaranthus plants. Soak the plants in a solution of 30 ml. of vinegar mixed in half a bucket of water for 30 minutes (the vinegar helps to clean the plants thoroughly).

          Peel the onion, chop to superfine pieces and set aside. Rinse the soaked Amaranthus plants nicely in 3 or 4 changes of clear water to remove all traces of dirt. Drain and chop to superfine pieces. Remove the stems of the green chilies and chop to superfine pieces. Grate the coconut. Transfer the chopped Amaranthus, the chopped chilies and the grated coconut into a mixing bowl. Sprinkle the salt and mix well, squeezing the mixture with your fingers. Set aside.

          Set a wok on high heat. Pour in the oil and throw in the mustard seeds. As soon as the mustard seeds are about to finish spluttering, tip in the split black gram lentils. When they turn golden brown, chuck in the chopped onion. Stir frequently. As soon as the onion turns a light brown, tip in the curry leaves.

          Stir once and put in the Amaranthus mixture. Stir well and turn down the heat. Cover with a lid. Every minute, open the lid and stir nicely. After 5 to 6 minutes, have a taste to check if the Amaranthus is cooked. If cooked, switch off the heat. Serve hot with rice or with bread.

Notes:

     1)    Try to grow your own Amaranthus or buy organic Amaranthus whenever possible, since commercially available Amaranthus often contains lots of chemical pesticides. Amaranthus grows easily in a wide range of climes and elevations and is an excellent source of iron, vitamins, minerals and fibre.

     2)    Using a sharp knife to slice the Amaranthus into extra fine pieces makes the toran more scrumptious.

     3)    While buying Amaranthus or other leafy vegetables from the market, it is often better to choose those which have been chewed upon by caterpillars or grasshoppers since they are relatively free of pesticides.

Friday 30 December 2011

171) YUMMY YAM CUTLETS


YUMMY YAM CUTLETS

       
Ingredients:

     1)    Yam – 1500 gm.


Freshly dug organic violet yam
     2)    Onion – 200 gm.
     3)    Bread – 500 gm.
     4)    Fresh or frozen green peas – 200 gm.
     5)    Mild green chilies – 5 Nos.
     6)    Black pepper powder – 1½ teaspoons
     7)    Garam masala powder – 1 teaspoon
     8)    Ghee (clarified butter) – 1 tablespoon
     9)    Coconut oil or other cooking oil – 1 tablespoon
     10)     Salt – 2 teaspoons
     11)     Butter or ghee or cooking oil – to grease the pan

To Cook:

          Peel the yam and cut into large chunks. Soak the pieces in a solution of 2 litres of water with 30 ml. of vinegar. This will help to remove the slime and the grime which will sink to the bottom. Wash in 2 or 3 changes of clear water. Drain and transfer to a pressure cooker. Pour in a litre of water and tip in 1½ teaspoons of salt. Put on the lid and set on high heat.

          As soon as you hear the first whistle, turn down the heat and cook for 5 minutes. Switch off the heat and let cool naturally. Peel the onion and chop to superfine pieces. Pluck off the stems of the green chilies and chop to superfine pieces. Shred the bread finely with your fingers.

          Once the cooker is cool enough to open, take out the cooked yam and drain off the water (yam stock). Mash the yam nicely.

          Set a thick wok on high heat. Pour in the ghee and the coconut oil. Tip in the chopped onion and the chilies. Stir for 2 minutes and tip in the green peas. Turn down the heat to medium and stir. As soon as the green peas are cooked (they will change colour and will be partially fried), tip in the remaining salt (½ teaspoon) and stir.

          Now tip in the mashed yam and sprinkle the pepper powder and the garam masala powder. Use less pepper powder and garam masala powder if you like milder cutlets or if you are cooking for little kids. Stir quite well for the spices to mix fully with the yam.

          Tip in the shredded bread. Stir nicely and switch off the heat. As soon as the mixture is cool enough to touch, set a flat pan on medium heat. Grease it with butter or with ghee or with cooking oil. Cholesterol/cardiac patients can avoid the greasing by using a non-stick pan.

          Make lemon sized balls from the mixture. Flatten them into thick (1 cm.) patties and put them on the greased pan. Lower the heat, cover with a lid and roast the yam cutlets slowly (see note no. 3). As soon as the lower side is lightly caramelized, put a few drops of melted butter or ghee or oil on top of the cutlets and gently flip them over to roast the other side.
Serve hot with fresh tomato sauce (see my recipe). These cutlets are so tasty that kids queue up for the cutlets as they are getting roasted. So as soon as you spot a yam, go right ahead, cook and enjoy!


Yam cutlets with fresh tomato sauce
Notes:
     1)    For the rustic styled cutlets in the picture, I have used violet yam. You can make beautiful cutlets of varying natural colours by using violet, pink, cream, rose or white yams.
     2)    For restaurant style shape and softer texture, you can use a cutlet/cookie cutter and also substitute the bread with 300 gm. (approx.) of bread crumbs.
     3)    Covering the cutlets with a lid or cloche while roasting makes them softer and the slow roast method gives them better texture and taste.

170) ALSANDYA UPKARI


ALSANDYA UPKARI
AN EASY TO MAKE KONKANI
COWPEA BEAN SIDE DISH


Ingredients:

     1)    Tender long cowpea beans – 500 gm.


     2)    Dry hot red chilies – 3 Nos.
     3)    Coconut oil or other cooking oil – 1 tablespoon
     4)    Mustard seeds – ¼ teaspoon
     5)    Salt – ¾ teaspoon

To Cook:

          Wash and drain the cowpea beans. Cut off the tips and chop to fine pieces (around 2 to 3 mm. thick). Break each dry chili into 2 or 3 pieces.

          Set a thick cast iron wok on high heat. Pour in the oil and tip in the mustard seeds. As soon as the mustard seeds are about to finish popping, throw in the chili pieces. Stir once and chuck in the chopped cowpea beans. Sprinkle the salt.

          Stir well and cover with a lid. Lower the heat. Stir occasionally. There is no need to add any water. Take care not to burn at the base. The cowpeas will change colour and cook in 5 to 10 minutes depending on the variety and maturity of the beans.

          Taste and adjust the seasoning. Serve hot alsandya upkari with rice, chappatis or with freshly baked bread. You will love this simple, mild, naturally sweet and delicious vegetable dish.

Enjoy!!!

Tip:

          If you like, you can add freshly grated coconut (a quarter of a coconut will do) as a dressing for extra texture and taste.
    

Notes:

     1)    A traditional way of preparing alsandya upkari is to break the cowpea beans by hand into 1 inch pieces (after removing the tips). Mature beans are shelled and only the seeds are taken. Only a cast iron wok is used for the cooking. Grated coconut is not used. This traditional alsandya upkari too is very tasty. Try for sure!


     2)    You will see that the taste changes with the style of cutting even when the ingredient as well as the method of preparation is exactly the same.

169) LOSUNÉ GOJJU


LOSUNÉ GOJJU
A KONKANI GARLIC CHILI MINI CURRY


Introduction:

          The tradition of preparing garlic gojju started in ancient times when people were poorer and leading simpler lives. With hardly anything but just plain cooked rice or gruel to eat and a large number of mouths to feed, the best option was to prepare some kind of easy pickle-like curry to dip a ball of rice in for gulping it down. The curry therefore had to be essentially tasty, simple and inexpensive. All the different mouthwatering gojjus of Konkani cuisine evolved out of this need.

          The present day Konkani person, no matter how rich or well-travelled or gourmet he or she may be, at the end of the day, in his/her heart of hearts craves not for the five star dinner or a festive feast, but simply to be back home to have some hot rice or gruel with a little gojju.

          Here, I give you two versions of losuné gojju. The first one is a milder easier version which I often prepare for my family. The second one is the hot, sour traditional version. Try both the versions and choose the one you like best.

MY EASY VERSION

Ingredients:

     1)    Garlic pods – 8 Nos.
     2)    Red hot chili powder – 2 teaspoons
     3)    Tamarind – an olive sized bit.
     4)    Ghee (clarified butter) – 1 tablespoon
     5)    Salt – 1 teaspoon

To Cook:

          Soak the tamarind in 100 ml. of water for 30 minutes. Separate the garlic cloves from their pods and peel them, cutting off the hard base portion if any. Squeeze the tamarind nicely with your fingers. Sieve and collect the tamarind juice.

          Set a small pan on medium heat. Pour in the ghee and tip in the garlic and the salt. Stir till the garlic turns golden brown. Now add the chili powder and mix well. Pour in the sieved tamarind juice together with 100 ml. of water. Taste and add more salt or chili powder to suit your palate. As soon as the curry comes to a boil, switch off the heat.

          Your tasty losuné gojju is ready to serve. You will note that it tastes even better the second day and keeps for 2 days. Losuné gojju has the power to improve your appetite.

THE TRADITIONAL VERSION

Ingredients:

     1)    Garlic pods – 8 Nos.
     2)    Tamarind – a 1 inch cube
     3)    Dry hot red chilies – 12 Nos.
     4)    Ghee (clarified butter) – 1 tablespoon
     5)    Coconut oil – 1 teaspoon
     6)    Salt – 1 teaspoon

To Make:

          Soak the tamarind in 100 ml. of drinking water for 30 minutes (the reason we use pure drinking water is because the traditional losuné gojju is not heated at any stage). Squeeze the tamarind nicely with your fingers. Sieve the tamarind juice and set aside. Break each of the red chilies into 2 pieces.

          Set a small pan on low heat. Pour in the coconut oil and tip in the broken chilies. Stir and roast the chilies for 2 minutes. Pour in the tamarind juice. Switch off the heat and let the chilies soak themselves in the tamarind juice.

          Separate the garlic cloves from their pods and peel them, cutting off the hard base portion if any. Set a small pan on low heat. Pour in the ghee. Tip in the garlic cloves and stir until they are roasted golden brown.

          Switch off the heat and put on a glove (remember, there were no kitchen hand gloves in olden times and the chefs had to weather it out). Squeeze the soaked dry hot red chilies nicely and tip over the contents of the pan into the pan with the roasted garlic. Mix well and taste. Add more salt or water if required. The traditional version of losuné gojju has no keeping quality and needs to be used up quickly.

Enjoy!!!

Note:

The amount of salt required may vary depending on the heat of the chilies used. You can get the perfect dish only by tasting.

Thursday 29 December 2011

168) AVARA UPKARI


AVARA UPKARI
A YUMMY KONKANI SHELLED BROAD BEAN SLOW ROAST SIDE DISH

A SIMPLE DISH FIT FOR A GOURMET PALATE


Ingredients:

     1)    Freshly shelled mature broad beans (sollailalo avaro in Konkani and tole urinja avara or pacha avara vitthe in Malayalam) – 500 gm.


     2)    Dry hot red chilies – 5 Nos.
     3)    Coconut oil – 1½ tablespoons
     4)    Mustard seeds – ½ teaspoon
     5)    Salt – 1 teaspoon

To Cook:

          Wash and drain the broad bean seeds. Break each red chili into 2 or 3 pieces. Set a thick cast iron wok on the stove. Pour in the coconut oil and throw in the mustard seeds. As soon as the mustard seeds are about to finish crackling, tip in the broken dry chilies. Stir once and put in the broad bean seeds. Pour in an equal volume of water. Tip in the salt.

          As soon as the water starts to boil, turn down the heat and cover with a lid. Let the seeds cook for approximately 25 minutes, taking care to stir occasionally so that the salt is absorbed uniformly. The seeds will change colour when they are cooked.

          Bite into one to check if cooked. It should be soft when done. If nicely cooked, turn up the heat and stir frequently till all the excess water has evaporated. Now turn down the heat and let the seeds roast slowly, remembering to stir occasionally.

          Some of the seeds may become crispy with a deep fried feel. Now the avara upkari has become truly delicious. You can either switch off the heat or keep roasting for a while longer to suit your taste. The avara upkari takes one of the most preferred places in my family’s menu.

          Once you taste this special, simple side dish, I am sure yourself and your family will fall in love with it, despite the somewhat lengthy task of shelling the mature broad beans. You will find that no matter how much of avara upkari is prepared, there is never enough for everyone.

So do cook and enjoy!

Wednesday 28 December 2011

167) TEEK UMMAN


TEEK UMMAN
A VERY TASTY TRADITIONAL SOUTH KERALA KONKANI SPICY VEGETABLE MINI CURRY


Ingredients:

     1)    Bitter gourd – 125 gm.


     2)    Cucumber tree fruit – 125 gm.

     3)    Taro rhizome of elephant ear plant called monday in Konkani and chèmbe in Malayalam – 150 gm.

     4)    Potato – 125 gm.
     5)    Tender long cowpea beans – 2 Nos.

     6)    Hot green chili – 1 no.
     7)    Red hot chili powder – 2 teaspoons
     8)    Turmeric powder – ½ teaspoon
     9)    Salt – 1½ teaspoons
     10)     Water – 500 ml.
     11)     Mustard seeds – ½ teaspoon
     12)     Coconut oil – 2 teaspoons
     13)     Fenugreek seeds – ¼ teaspoon
     14)     Split black gram lentils (urad dal) – ½ teaspoon


     15)      Asafoetida powder – 2 pinches
     16)     Curry leaves – 2 sprigs
     17)     Jackfruit seeds if available – 100 gm.

To Cook:

          Split open the bitter gourd and remove the seed core. Chop roughly to medium sized pieces in the shape of your choice (see note).

          Peel the taro rhizome and the potato and chop roughly to pieces. Cut off the tip with the stem from each of the cucumber tree fruit and cut them lengthwise into 2 halves. If jackfruit seeds are in season, remove their translucent plastic-like skin coat and cut the seed lengthwise into 2 halves.

          Cut off the tips of the tender cowpea beans and cut them across into 4 cm. pieces. Pluck off the stem of the green chili and cut it once lengthwise and once across into 4 pieces. Pluck the curry leaves from their sprigs and set aside.

          Set a 2 litre pressure cooker on the stove. Pour in the coconut oil and throw in the mustard seeds. When the mustard seeds are about to finish popping, tip in the split black gram lentils. Stir till they turn golden brown and then tip in the fenugreek seeds. As soon as they start spluttering, tip in the asafoetida powder and the curry leaves. Stir once and pour in half a litre of water.

          Tip in all the chopped vegetables. Sprinkle the chili powder, the turmeric powder and the salt. Put on the lid. As soon as you hear the first whistle, turn down the heat and cook for 5 minutes. Switch off the heat and let cool naturally. The residual steam within the cooker will slowly cook the curry to perfection.

          Once the cooker is cool enough to open, the teek umman is ready to serve. Serve as a side dish to rice or as a dipping curry for machkat, dosas or roasted idlis. You will love this special curry which is so full of goodness.
Enjoy!!!


Notes:

     1)    There is no hard and fast rule with regard to the chopping up of all the vegetables since the chopping size varies from chef to chef. So also, the ingredients may vary provided that a sour vegetable is compulsorily included along with the rest of the vegetables. The commonly used sour vegetables are cucumber tree fruit, star fruit and tender mango. The tender mango happens to be the best of the lot owing to its superior flavor.

     2)    Traditionally, this curry is prepared not in a pressure cooker, but in a khadiyea colmbul (Konkani) or in a kallchatty (Malayalam) which is a vessel carved out of soft stone. The stone vessel stores up a good amount of residual heat and the curry goes on boiling even after it is taken down from the wood burning stove. The aroma wafting out from the khadiyea colmbul combined with the flavor of the wood fire is such that you will find your mouth so full of saliva you could perhaps float a ship in!

Follow us by Email and never miss a new recipe!